Lab 12 Entry: ISSR Analysis

Carter Pope

Professor John Paul

Molecular Ecology

11/20/18


Lab 12 Entry

ISSR Analysis


On November 14th I arrived at the lab and began by adding 1 microliter of loading dye to each of my 15 PCR tubes with a micropipette. I then went over to a large 2 % gel and a lab mate and I (Jinwoo) transferred 5 microliters of each of our samples into individual wells, making sure to change out pipette tips each time and that we recorded where our specific samples were located on the large gel. Once everyone in the lab transferred their samples into the large gel, the gel was run for a long time on a low voltage.

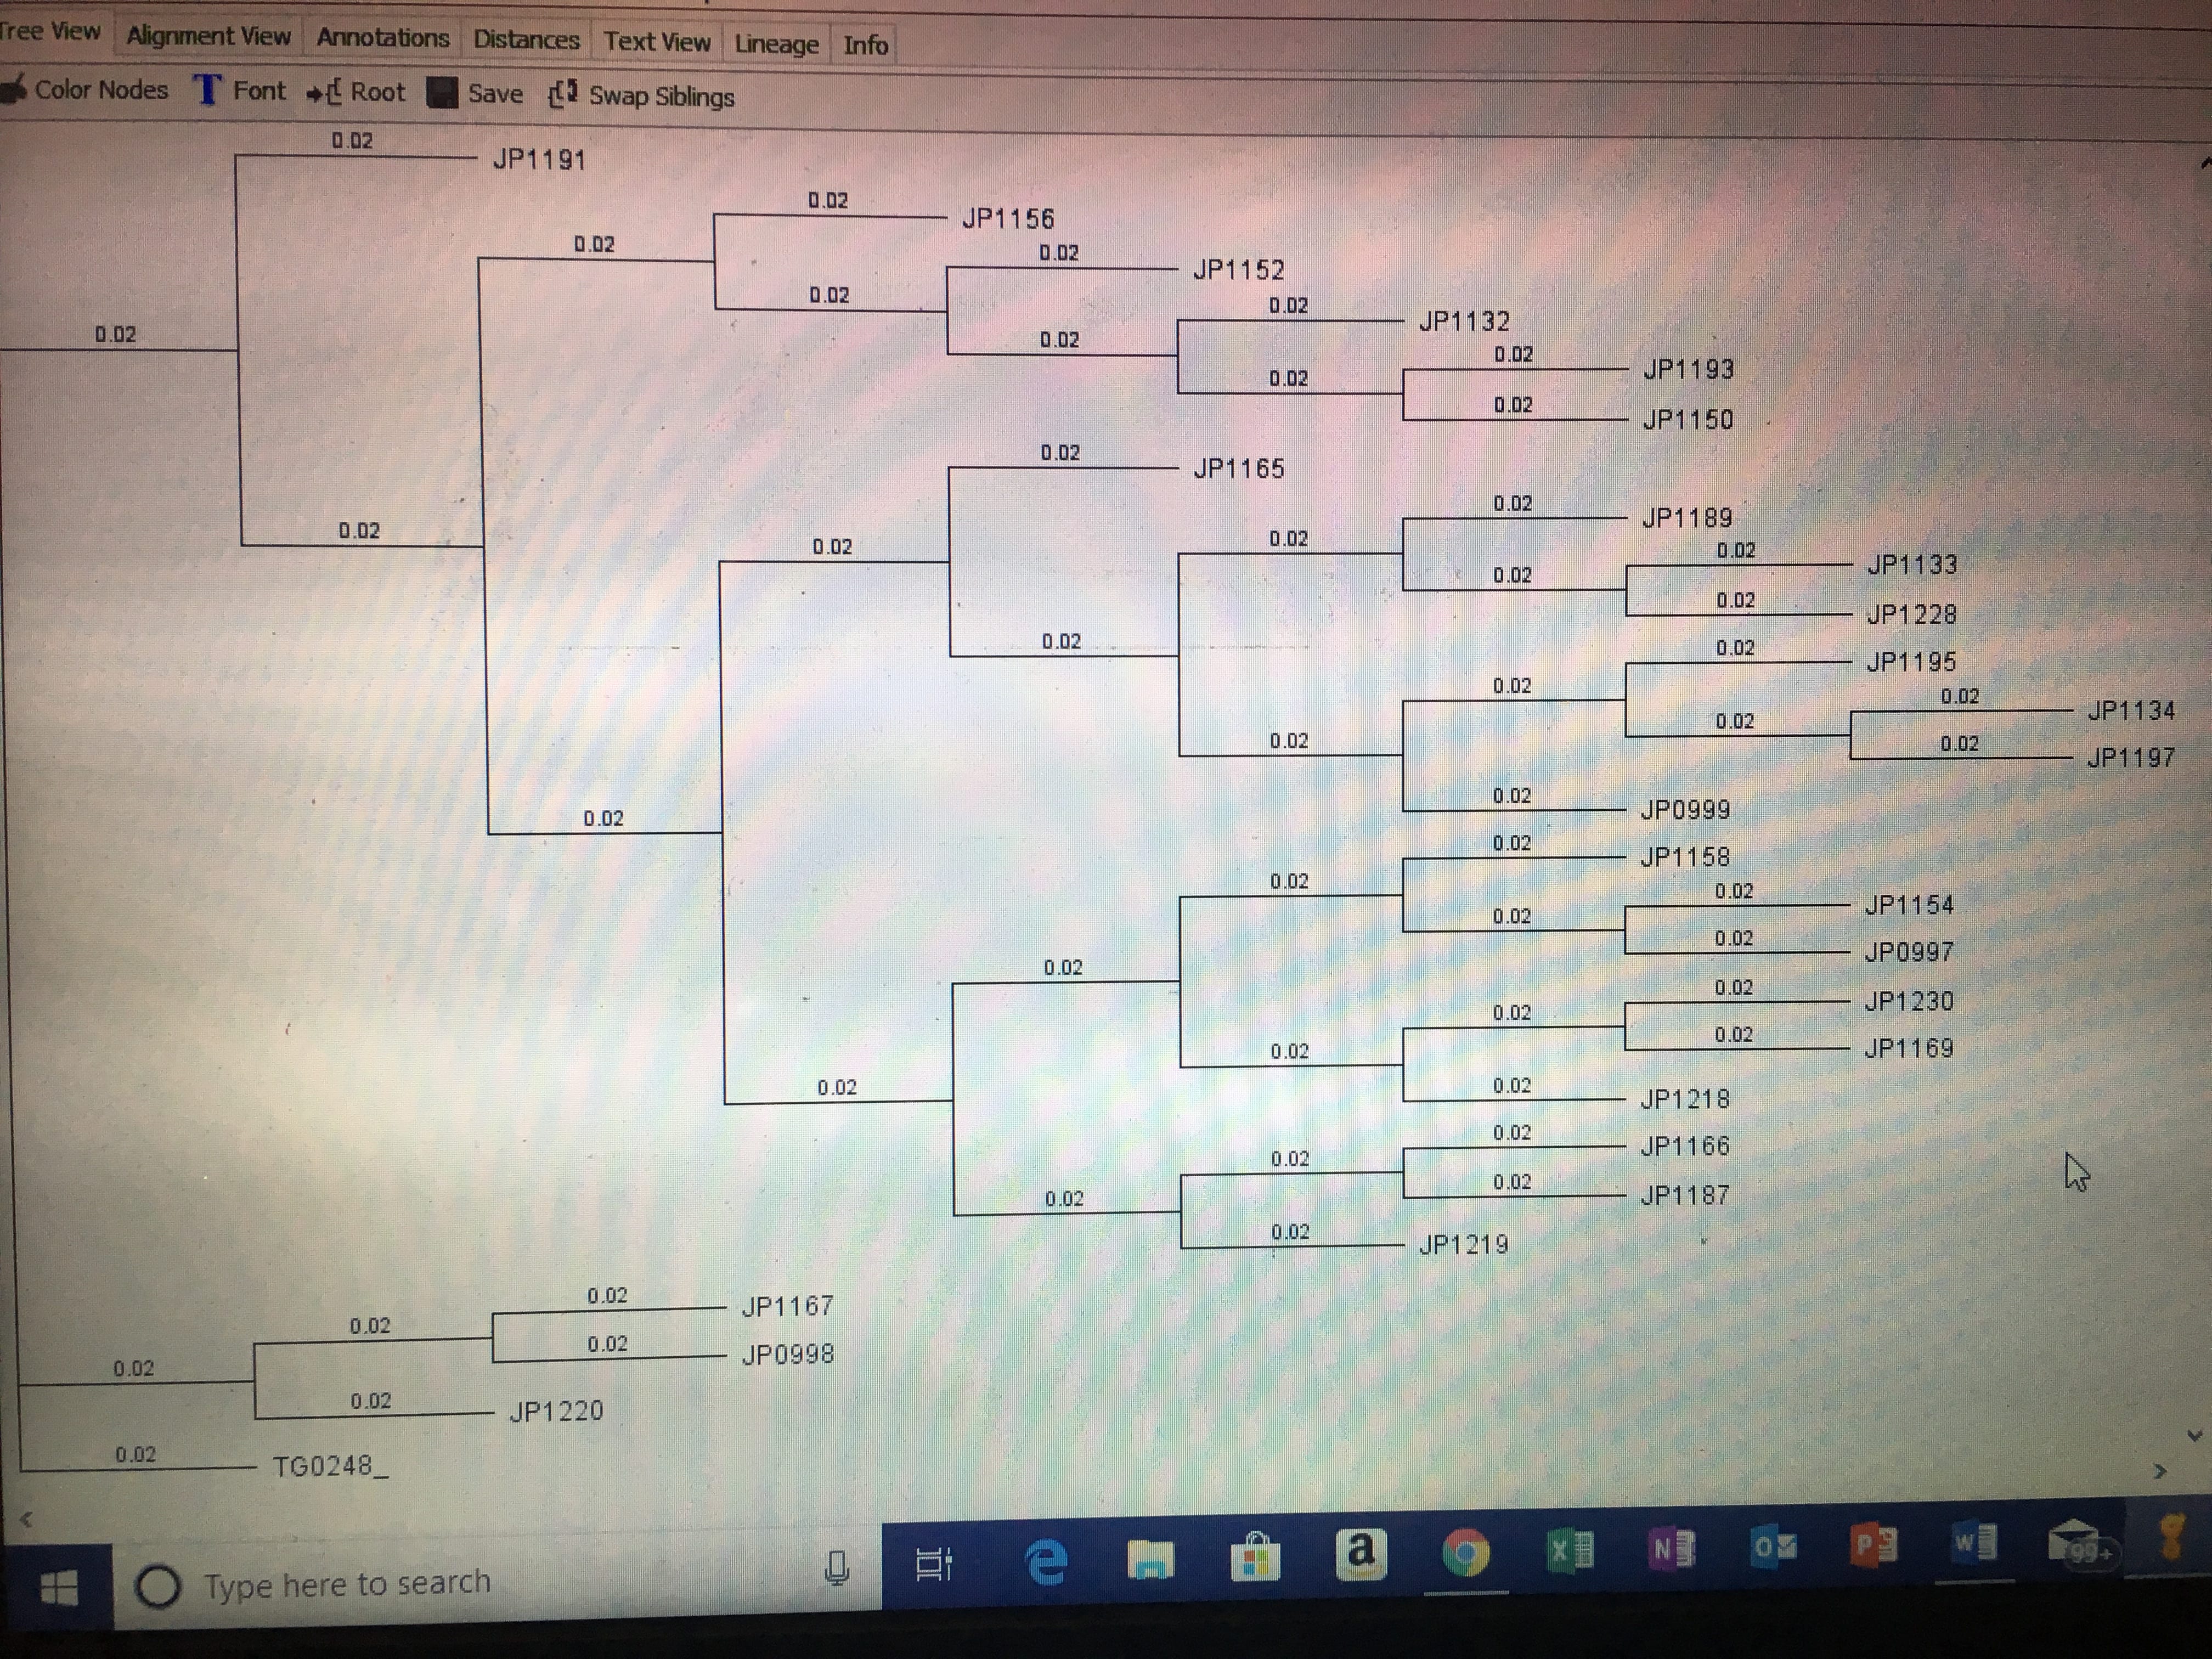
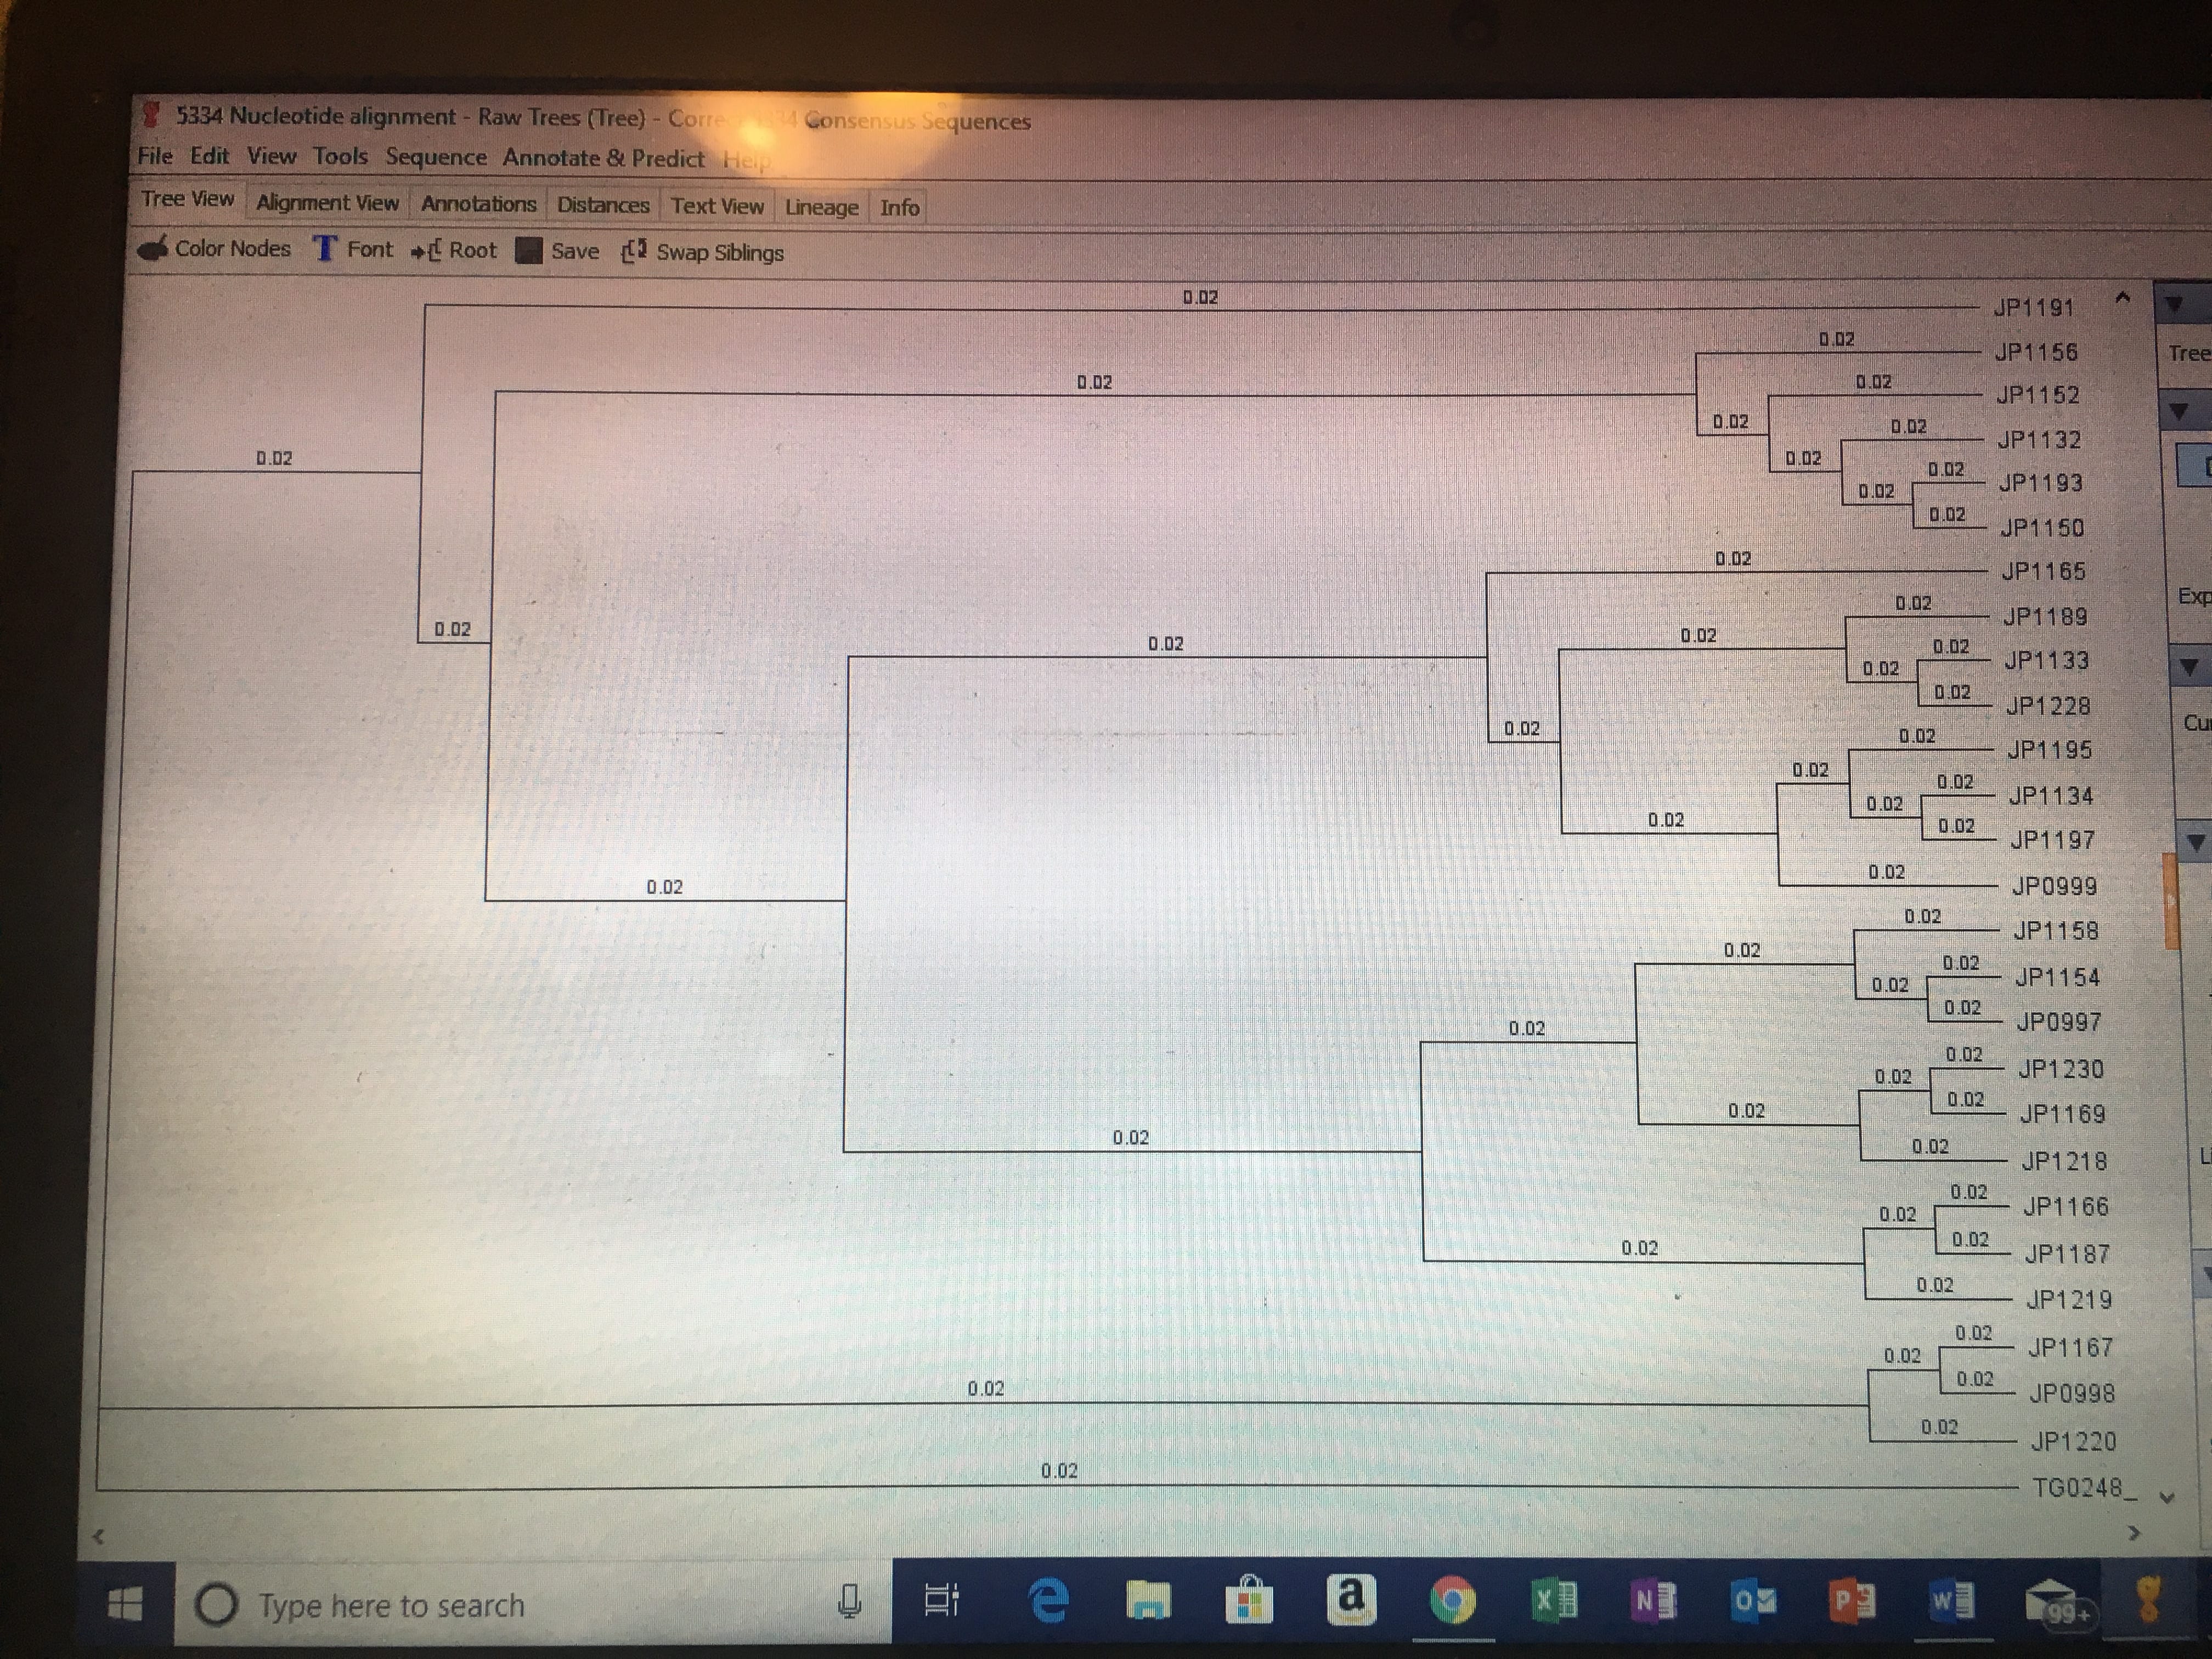
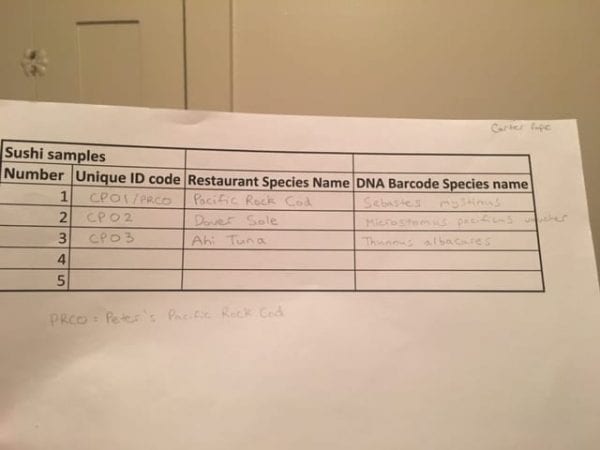
I then turned on my laptop and loaded Geneious up onto my screen. Unfortunately, our lab table’s DNA showed no success, so our professor had us use a different set of DNA and assigned us with a new marker (5551) to use as a replacement. Since we got new DNA and marker, we redid steps from a previous lab dealing with coding heterozygotes. I made a new folder in Geneious, downloaded, and extracted the DNA set for ‘5551’ from canvas to my folder and made an alignment using ‘Muscle’. I edited any bad parts of the alignment and then located any heterozygotes that needed new ambiguity codes. The next thing I did was select each forward and reverse pair for a single sample and make a consensus sequence for each one. After making sure each of these had correct editings and base calls, I created a sequence list with all of the consensus sequences that I made with each pair. Then I added in the two samples that didn’t have a pair (JP1314 and TG0248) with the sequence list and made an alignment with all of this using ‘Muscle’. Making sure edits were made on any necessary trimmings of the alignment, I then named it “5551_Nucleotide alignment_Carter” and put this into a new folder labeled as “Concatenate.” (I must’ve read past the next step during lab, so a few days later I exported this alignment from Geneious into canvas under the assignment called “EPIC ALIGNMENTS”)

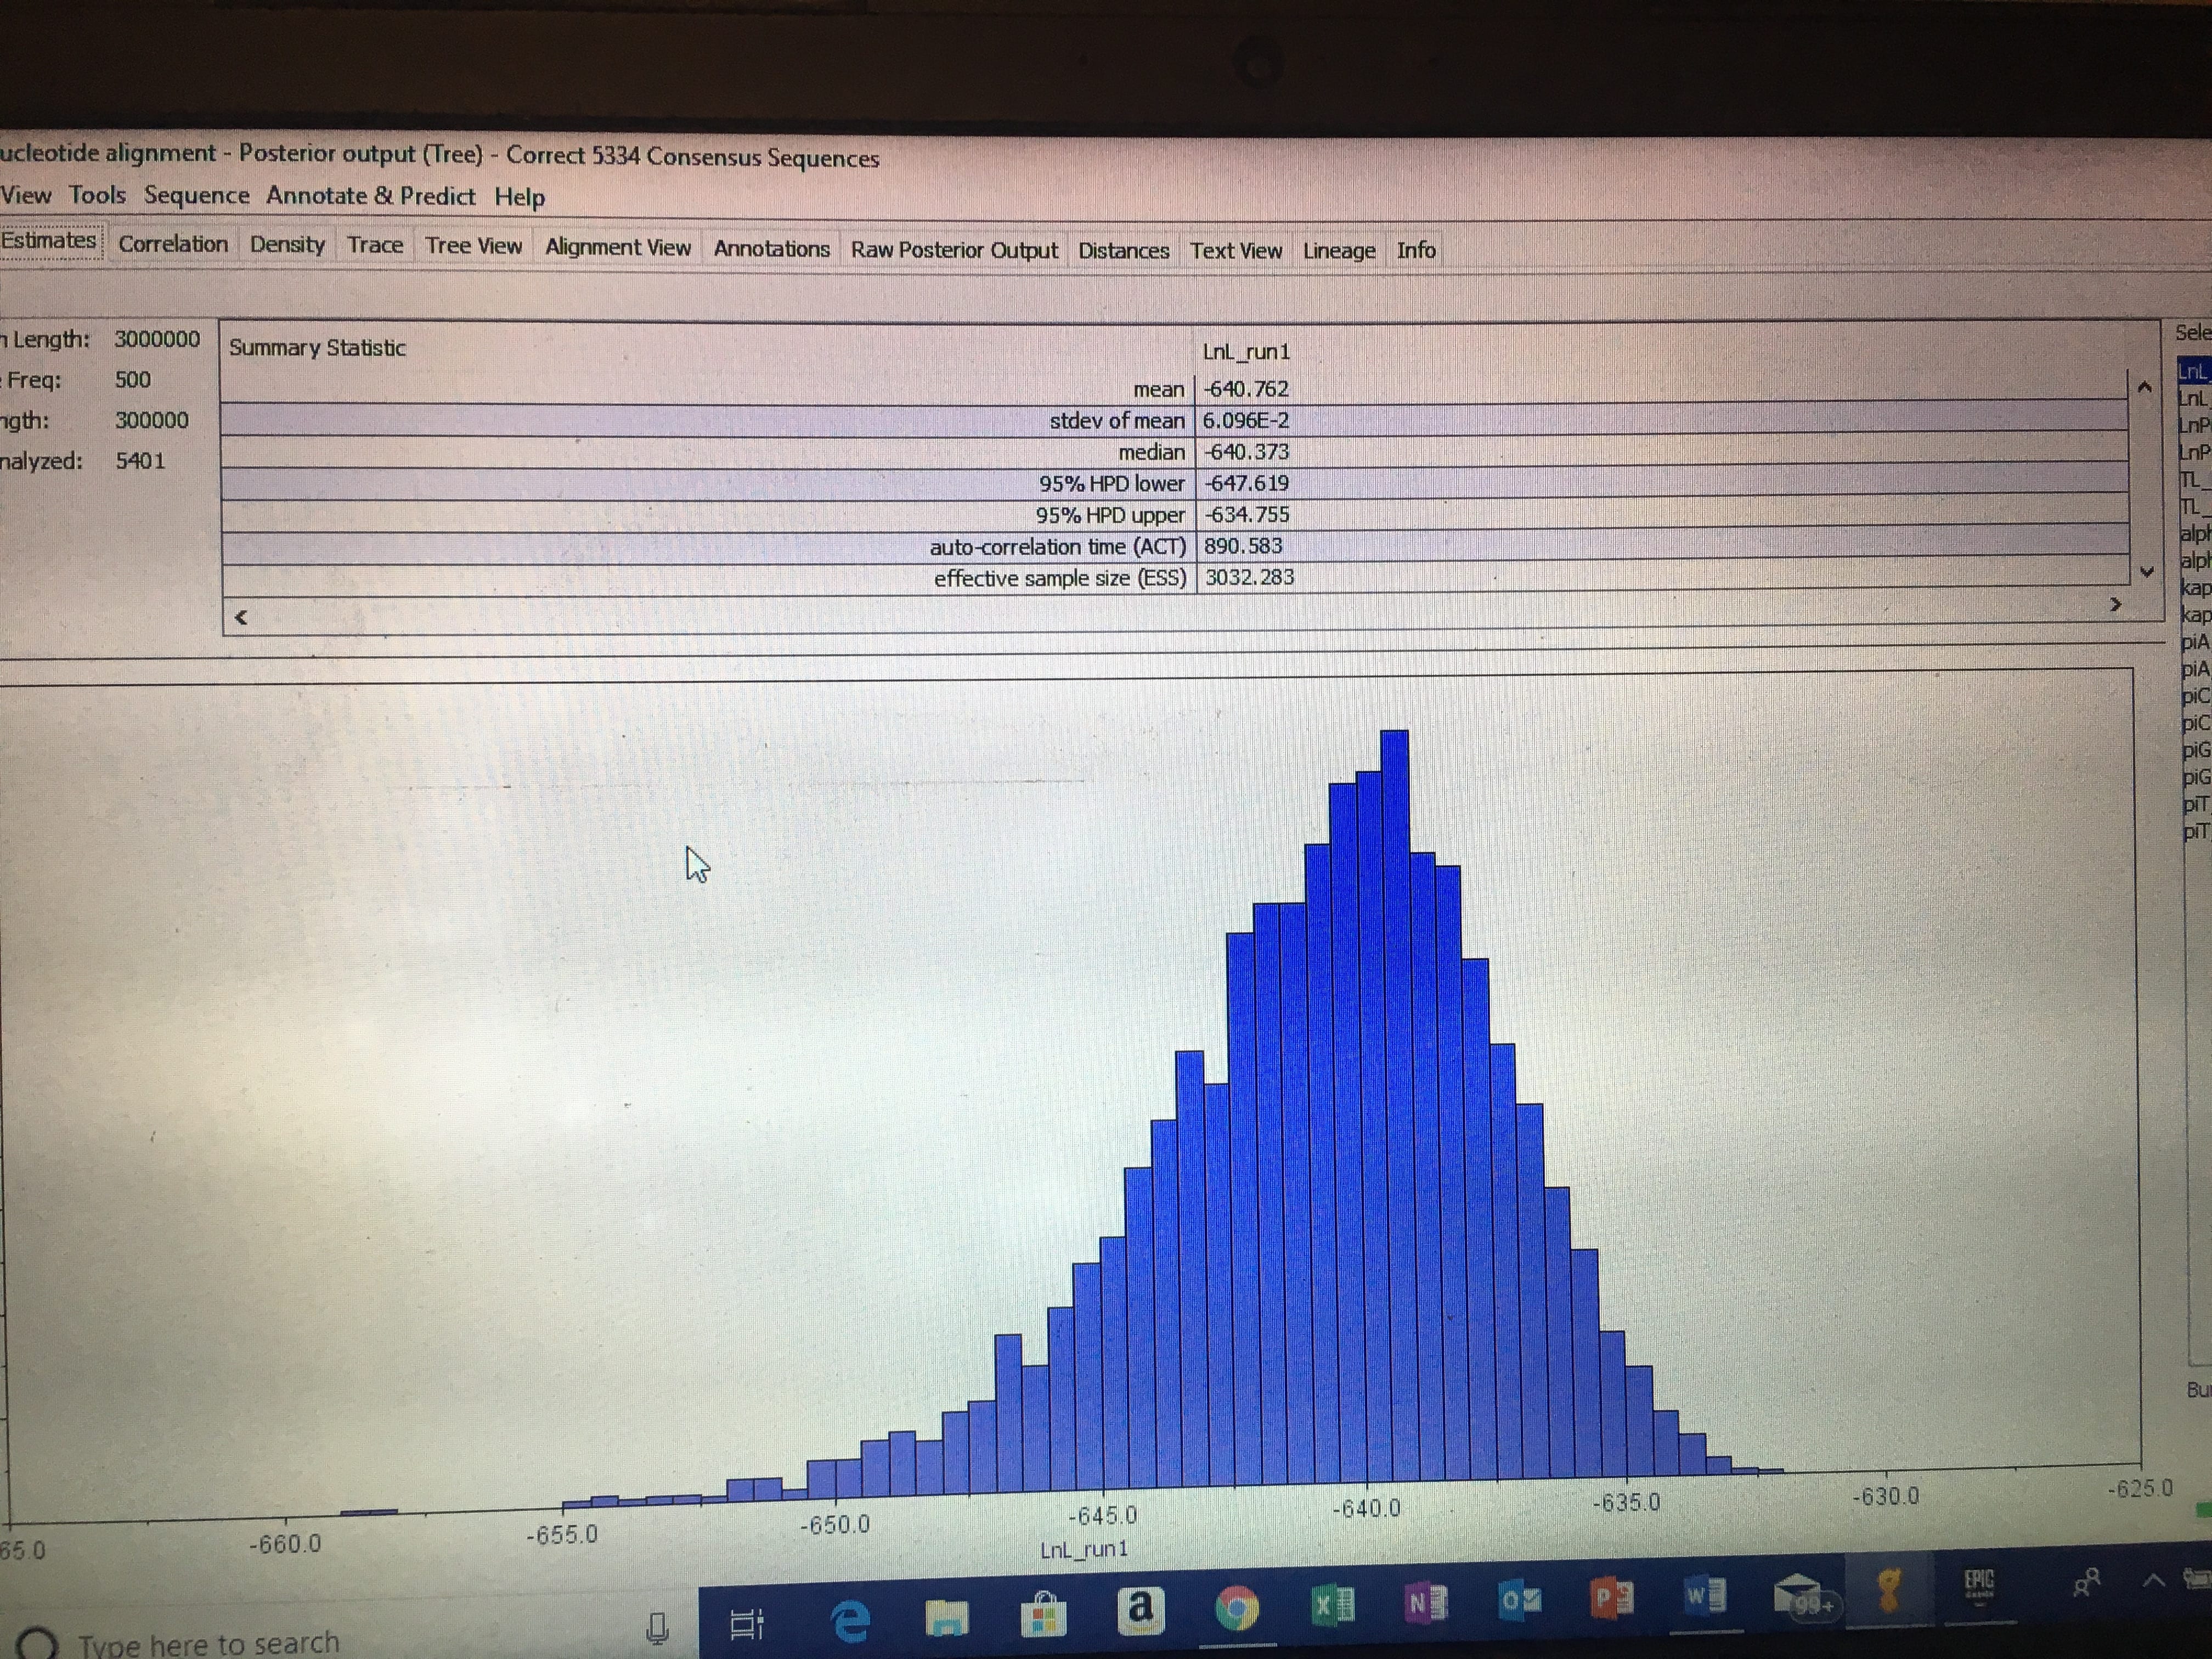
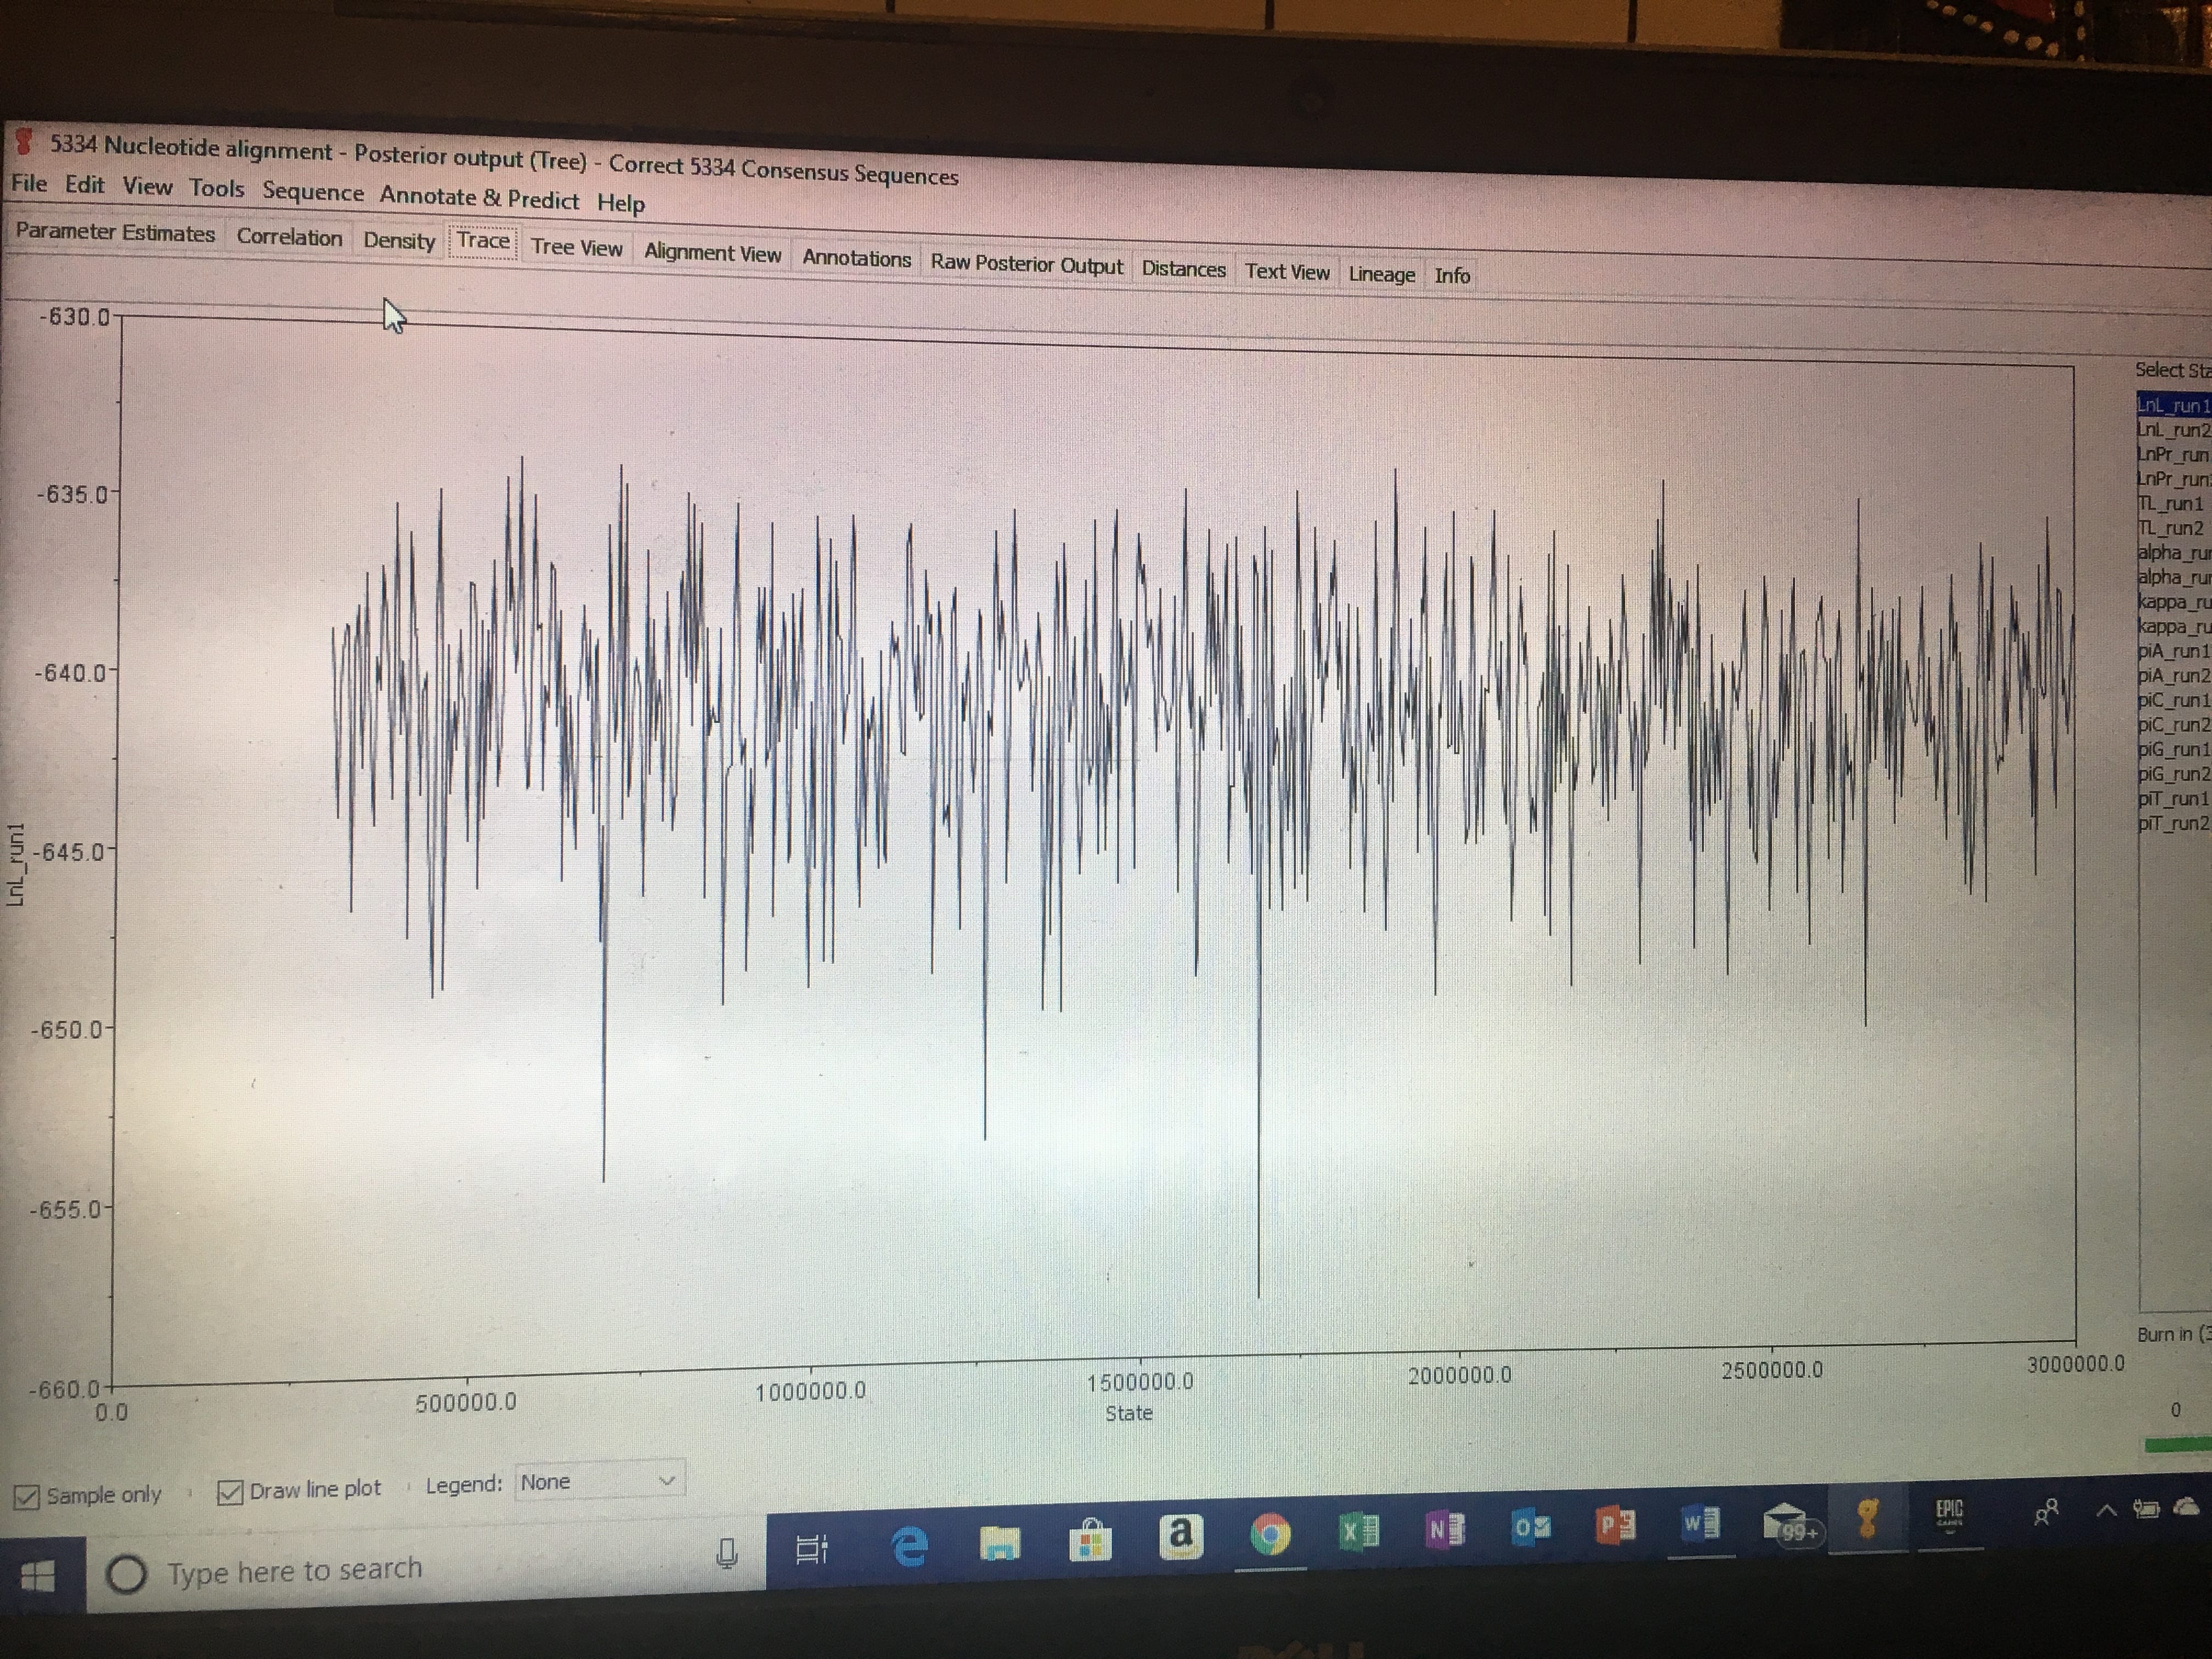
I then went to canvas and chose three other marker alignments (making neither of them were from the same marker) and downloaded/exported them into my Geneious folder called “Concatenate.” I then selected these three marker alignments, along with mine, and made a concatenate alignment. Further use of this concatenate alignment will be used to create analyses and phylogeny trees in further assignments.

Lab 11 Entry: Lupinus arboreus DNA PCR

Carter Pope

Professor John Paul

Molecular Ecology

11/10/18


Lab 11 Entry

Lupinus arboreus DNA PCR


On November 7th, I arrived at the lab to shift my focus towards running a PCR with ISSR primers for some Lupinus arboreus DNA samples that were from a previous class. I started by making three dilutions for each of my five Lupinus arboreus that I was given (making a total of 15 dilutions). In order to do this, I acquired fifteen 1.5 millimeter tubes and used a sharpie to label each tube with its correct sample ID and ‘1:10’ (each of the five samples had its unique ID). I then used a micropipette to transfer 45 microliters of water into each of the 15 labeled tubes. Next, I used a micropipette to transfer 5 microliters of the correct DNA sample into each of its three corresponding 1.5 millimeter tubes (making sure to change tips each time). Once my group completed these steps, we then put our dilutions into the correct tray for our professor to disperse evenly for each of the three different lab groups.

After our professor gave the lab groups the trays of every diluted sample, my lab table peers and I chose 3 different sets of the five DNA samples at random to work with a total of fifteen Lupinus arboreus DNA samples (For example, I chose CRA01-CRA05, PRK01-PRK05, and PSF01-PSF05) and recorded their unique ID and the date down on a piece of paper. I then got two strips of eight 0.2 millimeter tubes and labeled each tube lid with a number (starting with ‘1’ for the first tube and increasing in value with each tube until reaching the last tube and labeling it ’16’). I then labeled the side of each tube with the unique ID and put both my initials (CP) and our primer name (17898) on the side of the strip of tubes. I used a micropipette and filtered tips (making sure to change them after each transfer) to then transfer 1 microliter of each of 15 different diluted DNA samples into each of the correct corresponding 0.2 millimeter tubes that I just labeled in the previous step. Once I finished transferring the 1 microliter into the tubes, I put my tube strip on ice until my lab group finished.

During this time, a person in my lab group (Kayla V.) made a master mix for 80 reactions (60 for our group’s total number of samples plus an additional 20 just in case). I then used a micropipette to transfer 19 microliters of the master mix into each 0.2 millimeter tube in the strips (being careful to change the tips each time) and carefully mixed the solution by pipetting up and down slowly in the tube. The tube stips were then given to our professor, who would then put them into the PCR machine.

Lab 10 Entry: Analysis of EPIC markers

Carter Pope

Professor John Paul

Molecular Ecology

11/6/18

Lab 10 Entry

Analysis of EPIC markers


On October 31st, I arrived at the lab and was given the sad news that none of our class’s plant DNA worked. Instead, we used a previous class’s plant DNA as a temporary replacement to continue our work with Geneious. I began by opening Geneious on my computer and making a new folder to hold my EPIC sequence reads, both the forward and reverse sequences. After importing these sequences from Canvas to my new folder, I then built an alignment using Muscle and began trimming the bad reads at the beginning and end of the sequences.

Once these edits were made, I zoomed in and began looking for polymorphic sites, heterozygous sites, as well as sites that were both heterozygotes and had polymorphisms. Polymorphic sites could be found in my following columns: 50, 91, 106, 131, and 411. Heterozygous sites could be found in my following columns: 271, 391, 403, 412, 457, 458, 465, and 468. Sites that were heterozygous and polymorphic were on columns 403 and 412. The heterozygous sites were then edited to match the correct IUPAC Ambiguity Code.

The next step I did was to create consensus sequences from the forward and reverse reads. I began by selecting the forward and reverse pair for each specific DNA code and aligned them to make a new assembly document. I edited out bad sections of the new aligned sequences, changed any obvious unknown bases that were labeled “N”, and then saved the changes. I did these previous two steps for every individual DNA code that had a forward and reverse read (TG0248 and JP1132 were the only two that didn’t have both the forward and reverse read). Then I selected all of my newly edited assemblies and created a new consensus sequence list. I extracted this sequence list to a new subfolder and labeled it “5334 Consensus Sequences”. I then edited this “5334 consensus sequence” with a “Batch Rename” and put 34 in the text space provided in order to remove all the characters except the sequence name for the selected documents which is needed to concatenate the alignments of different markers. However, after working with Professor Paul and Jinwoo Kim during office hours, we discovered that selecting 34 would result in the four number on the far right on the identification code being cut off. This lead to a problem because several DNA samples now had the same code and they now couldn’t be distinguished. Therefore, I redid the steps starting from extracting the sequence into a new subfolder and this time labeled it “Correct 5334 Consensus Sequences” and put 33 in the text space provided. This fixed our problem and I continued by adding the TG0248 and JP1132 which were the two that didn’t have both a forward and reverse read, and added them into the “Correct 5334 Consensus Sequences”.

I then built an alignment with Muscle using the default parameters for the “Correct 5334 Consensus Sequences” and made a last minute edit towards the end of the alignment which cut off a few hundred base pairs that looked bad. I saved these edits and then renamed it as “5334 Nucleotide Alignment”.

At home, I continued working in Geneious by inferring a Bayesian tree of this single locus alignment. By using my “5334 Nucleotide Alignment” and choosing MrBayes to run a tree, selecting M. lewisii (TG0248) as the outgroup, and running the tree long enough, I was able to get a good posterior distribution and fuzzy caterpillar.

The tree on the left shows equal branch length and the one on the right shows proportional branch length.

My laptop is very difficult in cooperating with me when it comes to transferring over images and dealing with big images that hold a lot of memory so I had to take a picture of my laptop screen with my iPhone. Link: 5334 nucleotide tree-288bbml

Based off of the trees that I created, I can infer that there are many clades that are strongly supported through the MrBayes that I ran. The clades that are formed support the idea that they indeed represent geographic populations for the most part. The clades will show that the plant species in each clade are in a similar geographic setting; however, other clades can possibly also be in a generally similar geographic setting, regardless of them being in a different clade.


Below shows my posterior distribution and my trace:


Thoughts: For some reason, I can’t seem to find my options for working with my nodes and even changing the decimal place for them won’t change when I try editing the settings. I might have to go in during office hours and find any potential mistakes that may have occurred.

Lab 9 Entry: PCR Reactions for Plant DNA

Carter Pope

Professor John Paul

Molecular Ecology

10/28/18

Lab 9 Entry

PCR Reactions for Plant DNA


On October 24th, I arrived at the lab and continued with my focus on the plant DNA. My lab group and I began by obtaining our test tubes of our three samples of different plant genomic DNA and went to the corner to begin the gel electrophoresis. Kayla and Jinwoo used a micropipette to transfer 1 microliter of loading dye and 3 microliters of each person’s personal sample of DNA onto a piece of parafilm in order to make a total of 12 little 4 microliter droplets. These droplets were recorded on a separate piece of paper for later identification purposes and then the droplets were transferred into separate wells inside the gel. Once everyone had their droplets in the wells, the gel was then run for about 20 minutes at around 140 volts. Once these gels were completed, they were taken to the back machine to be analyzed by our professor.

Thought: I couldn’t find the picture of my gel on canvas, but I know that one of Kayla’s samples and one of Jinwoo’s samples didn’t work as well so we removed those from our batch, along with a few other samples that didn’t work from other groups at the lab. Peter and I were fortunate enough to have our samples working and fully visual on the screen.

I then shifted my focus to plant DNA PCR and prepared two additional tubes for each of my three samples. I began by acquiring these 6 tubes and correctly labeling them with the sample code and pipetted 20 microliters of the correct template DNA into each.

Next, I began setting up the EPIC PCR and acquired 8 Mimulus cardinalis DNA samples at random and also got a strip of eight 0.2 microliter tubes. I labeled each of these tubes with the sample code, the primer number that corresponded to our group (5334), the date, and the tube number on the top lid. I transferred 1 microliter of each different DNA sample into the correctly labeled 0.2 microliter tube being sure to change each filtered tip between samples. I then placed the strip of the eight tubes on ice.

Jinwoo then began making our group’s master mix, which was designed to be used for about 40 samples (even though we had a total of 32 samples to do), just in case someone accidentally took too much during their transferring. I then transferred 19 microliters of the master mix into each of the eight tubes (also slowly drawing the mixture up and down the tip with the pipette to mix the solution) being careful to change the filtered tip each time just to be safe. Once each tube contained 1 microliter of its correct DNA and 19 microliters of the master mix, the eight tubes were then closed (I didn’t have to use the centrifuge because my solutions in the tubes didn’t need to be spun down) and put into the PCR machine.

On October 9th (Monday) my group and I ran a quick gel electrophoresis for our DNA samples from the eight tubes to prepare for our professor.

Lab 8 Entry: Plant DNA Extraction

Carter Pope

Professor John Paul

Molecular Ecology

10/19/18

Lab 8 Entry

Plant DNA Extraction


On October 17th, I arrived at the lab and began our protocol for the plant DNA extraction. I started by obtaining three random capsules with different plant tissues and silicon pellets in each of them from my professor. I then labeled three 2.0 ml tubes with my initials and the plant sample code that was given on the capsule of each of the three plant variations (JP1231, JP1298, and JP1229). Three small sterile 3.2-mm stainless steel beads were added into each of the newly labeled 2.0 ml tubes. The size of about a fingernail of each of the three plant samples was then transferred with a sterile pair of forceps into the correct corresponding 2.0 ml tubes that were labeled with the sample code, along with the steel beads. Between each plant sample transfer, I wiped the forceps with 70% ethanol to ensure no cross contamination was occurring.

My lab group and I then brought each of our three 2.0 ml tubes over to our professor in the corner of the lab, where he showed us how to assemble the modified reciprocating saw in order to crush the plant tissue with the steel beads during the vibrations. I then took my three tubes over to the centrifuge and had them spun for about 15 seconds at a fast speed. Next, I brought my tubes back to the table and added 434 microliters of preheated grind buffer into each tube using a p1000 micropipette and filtered tips and then brought these tubes to a hot water bath to be incubated for ten minutes total and inverting the tubes every three minutes to mix the contents inside.

After the ten minutes passed, I brought the tubes back to my table and added 130 microliters of 3M ph 4.7 potassium acetate into each tube with a micropipette and filtered tips. Then I inverted the tubes and placed them in the centrifuge to be spun at maximum force for 20 minutes, making sure my lab group balanced out our tubes in the centrifuge. I then brought these tubes back to our table and acquired three new 1.5 ml tubes from our professor and labeled them with our initials and plant sample codes. I then used micropipettes and filtered tips and transferred out only the supernatant (avoiding any precipitate from inside the tube) from the 2.0 ml tubes that I just took out of the centrifuge and put them into the correct corresponding 1.5 lm tubes that we just got. Since each of my supernatant levels for each plant sample code measured out to 400 microliters, I then added 600 microliters of binding buffer to each of the 1.5 ml tubes (I added 1.5 volumes of the binding buffer of my total measurement of supernatant that I acquired).

After that, I got three new Epoch spin column tubes, initialed and labeled each with the three different sample codes. I transferred 650 microliters of each of the mixtures from the 1.5 ml tubes into the three new and correct corresponding Epoch spin column tubes.  I then centrifuged these tubes for ten minutes and removed the waste liquid that settled to the bottom of the tubes into a waste beaker. I then put the remaining mixtures from the 1.5 ml tubes and put them into the same corresponding Epoch spin column tubes to centrifuge again for ten minutes and emptied out the waste liquid that settled at the bottom. I added 500 microliters of 70% ethanol to each of the Epoch spin column tubes and centrifuged them for eight minutes. After the eight minutes, the waste liquid at the bottom was removed into the waste beaker. I then once again added 500 microliters of the same ethanol to the Epoch tubes and centrifuged them for eight minutes once more to collect and remove the waste liquid. Then I removed the “flow-through” parts of the Epoch tubes and kept the “column” parts.

Once this was done, I took my three “columns” to the centrifuge and spun them for five minutes to remove any residual ethanol from the previous steps. The “columns” were then placed into three newly initialed, sample coded, and dated 1.5 ml centrifuge tubes. I added 100 microliters of preheated pure sterile water into each of these 1.5 ml tubes and let them sit for five minutes. Then I centrifuged the tubes for two minutes at high spin to elute the DNA. The tubes holding our plant DNA was then given to our professor.

Thoughts: I hope our professor lets me use the modified reciprocating saw rack for later experiments.

Lab 7 Entry: Phylogenetic Inference

Carter Pope

Professor John Paul

Molecular Ecology

10/16/18


Lab 7 Entry

Phylogenetic Inference


On the 10th of October, I arrived at the lab and opened up Geneious on my laptop to make sure I had my COI sequences set up and aligned. After that, I proceeded to attempt downloading the “jModelTest2” and using Java; however, I ran into some technical difficulties and had to fast forward that step. This step would have allowed me to determine which model would have been best for my specific set of data and presented an accurate depiction of my data in a tree. I ran a Bayesian inference on my data by using “MrBayes” and used the generic settings with “HKY” since I had to skip the “jModelTest2.” I first tested with ‘Unconstrained Branch Length: Exponential (10), and Shape Parameter (10) to ensure my analysis was incorrect. I then fixed my parameters and got a gorgeous looking analysis. Next I used “RAxML” and tested out what my data looked like using ‘bootstrapping trees.’ After that I used “PHYML” and examined my data in this analysis. Even though I had some setbacks in the beginning, I was able to do a hard restart on my poor laptop and persevere through.

I will then run another “MrBayes” on my data but with different settings and create my best tree to show next lab on Wednesday the 17th of October.

Lab 6 Entry: Introduction to Geneious

Carter Pope

Professor John Paul

Molecular Ecology

10/9/18


Lab 6 Entry

An Introduction to Geneious


On the 3rd of October, I continued to work on the sushi project in the lab. I received my DNA barcoding sequences for my fish from Canvas and began the using the program called Geneious. Once Geneious was installed into my laptop and my DNA barcoding sequences were downloaded into Geneious, I began going through the tutorial handout on how to use the program. I learned how to do many tasks, such as creating new folders, reading forward/reverse sequences, and “BLASTING” my sequences.

From Exercises listed in the handout:

  1. Since my first fish sample (Pacific Rock Cod) didn’t work during the first round of the PCR, I used Peter Dubois’ Pacific Rock Cod sample (since we got the fish at the same grocery store) and discovered that we had a 99.4% pairwise value with Sebastes mystinus. Sebastes mystinus’ common name is the Blue rockfish. The description of the fish, which was Pacific Rock Cod, technically is an appropriate name for the fish sample because Blue rockfish falls under the category of Pacific rockfish, aka Rock cod.  The second fish sample (Dover Sole) had a 99.5% pairwise value with Microstomus pacificus voucher. Microstomus pacificus voucher’s common name is Dover Sole and matched the species that was labeled in the grocery store. The third and final fish sample (Ahi Tuna) had a 99.8% pairwise value with Thunnus albacares. Thunnus albacares’ common name is yellowfin tuna. Both yellowfin tuna and bigeye tuna are the two species that are classified under ahi tuna, so technically my fish sample was correctly labeled in general.


2.   For PRCD (Peter’s Pacific Rock Cod and Sebastes mystinus), there were four polymorphic sites in the alignment of the two located on the columns: 6, 9, 573, 615.

For CPO2 (Dover Sole and Microstomus pacificus voucher), there were three polymorphic sites in the alignment of the two located on the columns: 161, 203, 596.

For CPO3 (Ahi tuna and Thunnus albacares), there was one polymorphic site in the alignment of the two located on the column: 3.


Thoughts: I didn’t have more than ten polymorphic sites in my alignments which could suggest that my sequences were very short and if I had captured a longer sequence with no cuts previously made, I may have seen more polymorphic sites.


I then made a new alignment with included my three samples (including Peter’s PRC0) and 25 other sequences of different Actinopterygii that had the COI gene and had a similar length of around 500-700 bp, as well as an additional Chondrichthyes which acted as an outgroup for my phylogenetic tree that will be created next Wednesday on the 10th of October.


Lab 5 Entry: Field Trip to Alpine Dam/Mt. Tamalpais/Coast

Carter Pope

Professor John Paul

Molecular Ecology

10/2/18


Lab 5 Entry

Field Trip to Alpine Dam/Mt. Tamalpais/Coast


On September 26th I arrived at the lab and our class walked to the parking structure at Koret Gym. From there, we split up into two separate vehicles and drove to the Alpine Dam in Bolinas.

Picture Credit: Peter Dubois


Once we reached the dam, we proceeded to walk down a path which led us to the riverbed that the dam blocked. We searched here because the ground here contained the most moisture and the Mimulus cardinalis thrives in soil that is adjacent to water. Although we weren’t able to locate any of the Mimulus cardinalis, we did find a large population of ladybugs and got to venture a little off the beaten path. One student (Jinwoo Kim) acquired a few casualties on his right lumbrical muscles on his hand. A first aid kit was applied when we returned to the lab.

Picture Credit: Peter Dubois


We then walked back to the vehicles and drove further into the region of Mt. Tamalpais. We then parked in a little pullout area and our professor showed us his “go-to” location for Mimulus cardinalis. It was located in between two conjoining hills where water from the top flowed downhill to form a little spring. This was an example of how the plant grew in soil that was moist with water.


After taking pictures, we then drove west towards the coastline and traveled just south of Stinson Beach to a pullout area for cars. We got out and walked on a trail heading to the cliffside overlooking the ocean. We set our focus back to the purple-flowering lupines and were able to find some adjacent to the path we were walking on.

Picture Credit: Peter Dubois


After successfully observing both the Mimulus cardinalis and the purple flowering lupine, we drove back to the parking lot at Koret Gym and ended the field trip.


Thoughts: The views and scenery that we were able to see and take pictures of were very fascinating and unbelievable to be quite close to USF.


Lab 4 Entry: Field Trip to Pescadero State Beach

Carter Pope

Professor John Paul

Molecular Ecology

9/25/18


Lab 4 Entry

Field Trip to Pescadero State Beach


On September 19th, I arrived at the lab at 12:45PM. We then acquired a van and journeyed to Pescadero State Beach, south of San Francisco along the coast about 50 miles in hopes of seeing the yellow flowering Lupinus arboreus. Our professor then brought us towards the cliffside with sandy soil facing the ocean and showed us an example of Lupinus arboreus. These plants were scattered here and there along the cliffside but not in abundant numbers. There were no yellow flowers visible on this plant but it was still alive and well.


We then walked across the bridge and then under it in order to reach the other side of the road which was more inland. Here we also saw some Lupinus arboreus but in a little less sandy of soil. We were able to find some of the plants with flowers.


Other Lupinus arboreus were also located and we took pictures of them. They were about three to four feet wide and about two to four feet tall as mature plants.


After observing these Lupinus arboreus plants, we then headed back to the van and journeyed north towards San Francisco. We planned to also visit another beach ( I believe Pomponio State Beach) but due to time, we decided not to stop and look for more Lupinus arboreus because we risked getting caught in traffic. We arrived back at school around 4:45PM.


Lab 3 Entry: The Sushi Test (continued)

Carter Pope

Professor John Paul

Molecular Ecology

9/18/18


Lab 3 Entry

The Sushi Test (continued)


On September 12th, I returned to the lab and retrieved my PCR tubes that I put in the thermocycler on September 5th. Our group then brought our PCR tubes to the side benches in the lab and began setting up a new gel in order to do gel electrophoresis. One of my members (Kayla) used a micropipette and made four rows of three of 2 microliters of loading dye onto a small piece of parafilm. Kayla then added 3 microliters of each person’s PCR tubes in the correct corresponding rows of the droplets of loading dye, making sure to use a new pipette tip each time. I then used a microliter to transfer the 5 microliter samples from the parafilm into the wells of the gel, making sure to use different pipette tips each time and that the wells were labeled on a piece of separate paper and each person’s samples could be identified. Gel electrophoresis was then conducted for about 15 minutes.

Once approximately 15 minutes passed, our group collected the gel and took it to be observed under the machine for special imaging. The image showed that one of my group members had all three of their samples, two of my three samples worked (CP02 and CP03), and two of my members, unfortunately, had none of their samples work. My wells were the three on the far right on the top row.


Since two of my three samples worked (CP02 and CP03), I then continued with the ExoSap PCR Clean-Up protocol. I collaborated with a group of fellow classmates whose samples also worked. A master mix of containing water, 10x buffer, SAP, and Exo was made for 20 reactions and its combined total measured 250 microliters (12.5 microliters per reaction) and placed in ice. A long series of new PCR product tubes were provided by the professor and each of us received a certain number of these tubes (since I had two samples that worked, I got two tubes; my tubes were #10 for CP02 and #11 for CP03). I labeled and recorded my tubes with the appropriate identifications and proceded to transfer 7.5 microliters of my CP02 into #10 and 7.5 microliters of my CP03 into #11. Then I transferred 12.5 microliters of the ExoSap master mix into #10 and another 12.5 microliters into #11 (all while using clean pipette tips in between each transfer of liquids). Once each person finished establishing their PCR tubes, we all put our tubes together in a thermocycler. The lab period then ended and we were excused to leave. Our professor then put the tubes into a labeled tube rack and placed into the freezer.

On September 26th, we will continue with this lab and start the EXOSAP program.