A Comprehensive Guide to Kombucha Brewing and Drinking
 Introduction
If you have ever stepped foot in a Whole Foods, Trader Joe’s, or other health food store, you may be familiar with a drink called kombucha. Kombucha started rising to fame in the West in the 90’s and has only grown in popularity since then due to its purported health benefits and funky flavor. But what actually is kombucha? Is it actually good for you, or is it all metaphysical pseudoscience?
Kombucha, simply put, is double-fermented tea. The fermentation process begins with a yeast fermentation of sugar into alcohol followed by bacterial fermentation of alcohol into acetic acid (although this comprises less than 1% of the drink). Fermentation can seem strange or even gross to the uninitiated, but fermented foods are actually a staple of diets around the world, including in the West: think yogurt, olives, wine, and beer, among many others. Besides the improved shelf life and unique and unmistakable flavor of fermented food, there are real, provable health benefits to consuming this food group.
Kombucha, like many other fermented foods, is rich in probiotics. Probiotics are essential to maintaining a healthy diversity of gut microbiota. The gut microbiome is obviously important for digestion and nutrient absorption, but it also has been shown to affect other organs of the body such as the skin and the brain. Being tea, kombucha also has antioxidants, which neutralize free radicals (unstable molecules that damage DNA, lipids, and proteins and therefore increase the risk of chronic health conditions).
Kombucha has been around for thousands of years. It is thought to have originated around the year 220 B.C.E. in an area of northeastern China historically referred to as Manchuria. In the early 20th century, kombucha was brought to eastern Europe and Russia through trade route expansions. The story of the drink’s name is that a Korean physician named Dr. Kombu brought the drink to Japan as a treatment for Emperor Inkyo; “kombu” comes from the name of the physician, while “cha” is the word for “tea” in many eastern languages: thus, “kombucha.”
SCOBY and SCOBY Maintenance
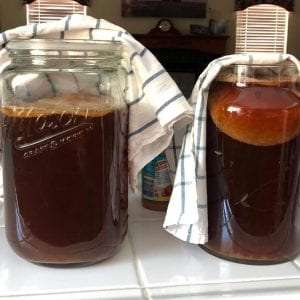
S.C.O.B.Y. stands for Symbiotic Culture Of Bacteria and Yeasts. That means this strange biofilm substance is alive! It has a thick, solid yet jelly-like consistency and looks like something you would find in a mad scientist’s lab. This organism is what facilitates the process of fermentation that turns sweet tea into kombucha. To be kept alive, it has to be kept at room temperature, always submerged in liquid (either tea or kombucha), and fed every once in a while.
When you are not making booch, the SCOBY should be kept in what is called a SCOBY hotel. That is basically a small, non-airtight container with enough kombucha or tea to cover the SCOBY. You can replace the tea/kombucha every few weeks or add sugar to feed it*. A SCOBY has died if there is mold on it or if it dramatically changes color.

I once left my SCOBY alone for like 4 months and it was fine so it is up to your discretion.
Making Booch
 There are two major methods for brewing kombucha at home but the required equipment is the same for both: you will need a big mason jar or similar container, about 32-64 oz; glass bottles with rubber flip tops; a SCOBY; tea and/or your flavoring of choice; and sugar.
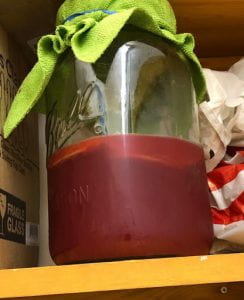
The first method for making kombucha is the “tea + flavor” process. The first step is (1) pick a tea to serve as a base; you can use any tea you like but black and green are both good places to start. Once you’ve selected your tea, you make a simple syrup. (2) Mix 1 cup of water and 1 cup of sugar, and boil until all the sugar has dissolved. (3) Add 4-8 bags of your tea directly to the syrup and let sit for up to a couple of hours depending on your desired intensity. (4) Remove the teabags and add 7-8 cups of water to the syrup. This brings it to room temperature, which is important because hot water will kill the SCOBY. (5) Transfer the mixture to a large mason jar, add the SCOBY, and cover with a cheesecloth, t-shirt, or loose lid. You want the booch to be protected from dust and pests, but it needs to have access to oxygen for this first fermentation. Let this concoction ferment for around a week, making sure to taste test for the desired acidity. Keep in mind that warmer temperatures will quicken the fermentation process and cooler temperatures will slow it down. (6) After about a week, remove the SCOBY, return it to its hotel, and add your flavor of choice. This is usually fresh fruit or fruit juice, but you can get really creative with ingredients at this stage (I’ve seen a recipe for carrot kombucha I want to try). Leave the kombucha to ferment for an additional 2-4 days without the SCOBY. Most likely, another thin baby SCOBY film will form on top of the kombucha, which you can discard. (7) Filter the kombucha. (8) Transfer the kombucha to the rubber flip-top bottles. An airtight seal is needed for the second phase of fermenting, wherein the CO2 produced as a byproduct of the fermentation process gets trapped in the pressurized bottle, creating that nice carbonation. Leave the bottles for around 3 days. This part is tricky; if you open the bottles too early, you lose carbonation, But if you open them too late, they will explode! (9) Cool the bottles in the fridge (kombucha is much better cold), and then it is ready to drink. Kept in the fridge, homemade kombucha can last up to 8 months.
The second way to make kombucha is the “flavor as tea” method. This method comes from The Noma Guide to Fermentation (Noma is a 3-Michelin star Scandinavian restaurant consistently ranked the best restaurant in the world by Restaurant magazine). Here, your flavor is your tea base, so you can make a tea of lavender or lemon verbena for example, or even something crazy like coffee. (1) Once you pick your flavor, you make the same 1:1 sugar-water syrup from step (2) of the previous method. (2) Let the syrup simmer, and add your flavor (herbs, flowers, juice, etc) directly to the syrup. (3) Add 7-8 cups of water. You could leave it to infuse overnight, especially if it is an herb like lavender. (4) Transfer to a mason jar with SCOBY, and leave for a week or more, taste testing as necessary. (5) Remove the SCOBY, filter, and bottle the kombucha. (6) Leave the bottles sealed for a few days, and the kombucha is ready!
You’ll find that once you start brewing kombucha, it is very easy to get invested. It really is a low-commitment hobby; most of the work is actually just waiting. There is so much potential for creativity as well, the possible flavor combinations are endless!
Works Cited
“KOMBUCHA BREWING & BOTTLING GUIDELINES.” Pennsylvania Department of Agriculture, Bureau of Food Safety and Laboratory Services, May 2017, https://www.agriculture.pa.gov/consumer_protection/FoodSafety/manufacturing-packing-holding-distribution/Pages/default.aspx.
Rapson, Jeanette. “What Are the Benefits of Fermented Foods?” Heart Foundation NZ, Heart Foundation NZ, 20 Aug. 2018, https://www.heartfoundation.org.nz/about-us/news/blogs/fermented-foods-the-latest-trend.
Redzepi, René,, and David (Chef) Zilber. The Noma Guide to Fermentation Artisan, 2018.
Troitino, Christina. “Kombucha 101: Demystifying the Past, Present and Future of the Fermented Tea Drink.” Forbes, Forbes Magazine, 12 Oct. 2022, https://www.forbes.com/sites/christinatroitino/2017/02/01/kombucha-101-demystifying-the-past-present-and-future-of-the-fermented-tea-drink/?sh=37123e8f4ae2.


