October 24, 2018
Following the previous lab session, an agarose gel electrophoresis was run using the extracted DNA to confirm the presence and quality of template DNA from the samples. Using exon-primed, intron-crossing (EPIC) markers for the primers, the obtained template DNA was amplified via PCR. Two additional tubes of sample DNA were made for each table such that each table had a copy of each sample.
Specifically, the following procedure was performed for the gel electrophoresis:
- Loading dye was pipetted onto a piece of Parafilm in 3-μL increments, following the placement of the wells on the agarose gel.
- 1-μL of template DNA for each sample was pipetted into a 3-μL spot of loading dye according to the order portrayed below.

- The total 4-μL volume of dye and template DNA was then pipetted into three separate wells on the gel.
- The gel box was then assembled with the correct alignment of positive and negative electrodes, then run for approximately 25 minutes at 140 volts.
- As the gel electrophoresis was running, two separate tubes were labeled for each sample, making a total of six newly labeled tubes portraying the sample IDs.
- 20-μL of DNA from the original tube was placed into each of the two tubes corresponding to the same sample ID. Repeated this step with all three samples, ensuring that pipette tips were changed when moving on to a different sample.
- Gel apparatus was disassembled, and the gel was removed from the apparatus onto a UV imagining machine.
- Picture of DNA bands was obtained.
After completing the gel electrophoresis, preparation of the template DNA and creation of the master mix for the PCR amplification was completed according to the steps listed below:
- Eight Mimulus cardinalis template DNA samples were obtained from the class pool.
- Tube numbers and sample IDs were recorded according to the table shown.
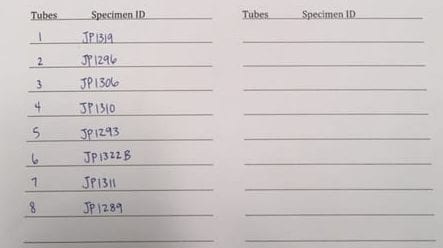
- One strip containing eight 0.2-mL PCR tubes were obtained and labeled with the tube number, specimen ID, according to the table, in addition to the primer and initials.
- 1-μL of template DNA was pipetted into each PCR tube, ensuring that the sample matched the tube number and changing tips in between samples.
- After transfer was completed, the PCR tubes were closed and placed on ice.
- A 1.5-mL tube was labeled as MM (MasterMix), and the reagents depicted in the image below were added in the following order: distilled H2O, 10x PCR buffer (including MgCl2), BSA, dNTPs, Forward primer, and Reverse primer.
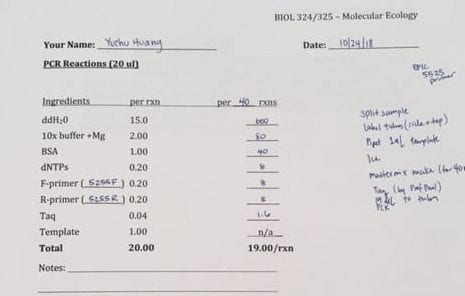
- This solution was then placed on ice until Professor Paul pipetted the required amount of Taq polymerase into the MM tube.
- 19-μL of the MM was then added to the PCR tubes.
- PCR tubes were closed and given to Professor Paul for PCR amplification.