Final Blog Post

Allyson Luber

12/3/2019

We conducted a double digest restriction association of DNA study on Mimulus Guttatus

  1. Collected samples (spread over the course of two field trips that can be found on previous entries, Lab 05 https://usfblogs.usfca.edu/mec2019/2019/10/01/lab-05-marin-fieldtrip/)
  2. Next, we extracted DNA from samples we connected as well as samples previously collected by Alec (Extraction post found here Lab 08 https://usfblogs.usfca.edu/mec2019/2019/10/29/lab-08-dna-extraction-m-guttatus/)
  3. Next, we double digested our DNA using two restriction enzymes (protocol found here in blog Lab 09 https://usfblogs.usfca.edu/mec2019/2019/11/05/lab-09-gel-electrophoresis/). These enzymes cut up the genomes into multiple pieces
  4. Next, we ligated unique DNA barcode into each of our individual samples
  5. We then used PCR for two purposes: 1) To add a second unique barcode (the table base) and 2) to test if our library construction was successful.
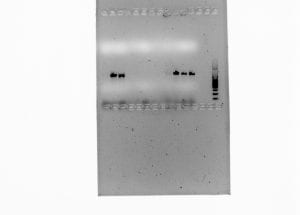
  6. Our PCR was successful as evidence taken by Professor Paul (not on Canvas 😉 ) After the test PCR, we did a larger reaction (25 microliters).
  7. This is the last step we were able to do as a congregation of Molecular Ecology class.
  8. (Steps we would’ve done given more time)
  9. Size selection selects DNA of specific sizes. Specifically, we would target ~400-600 base pair fragments.
  10. Size selection can be done 3 ways: 1) Automated system called PIPPINPREP (housed in Suni lab) 2) Gel Extraction 3) Magnetic beads to isolate DNA fragments
  11. After size selection, we would then normalize our DNA samples (bring all of our DNA samples to approximately same concentration). This means, having equal concentrations makes more likely number of DNA fragments to be sequenced.
  12. The final step would be to combine all of our size selected normalized PCR products into one vessel.
  13. Then we would run these samples on any Illumina sequencers, we’d run it on our “Wall E” sequencer that’s in house.
  14. Sequencing would take approximately 16 hours. If successful, we’d generate 10-20 million reads.
  15. These data would be run through a bioinformatic pipeline.
  16. Ultimately, we would align this sequence data with the published M. guttatus genome and call SNPs (identifying SNPs within database)
  17. Finally, we would use the SNPs to infer population differentiation like using Fst and assess population genetic diversity, looking at things like alleles, allelic diversity, etc.
  18. Based on what I know about Mimulus guttatus, I might expect populations to be genetically divergent based on their characteristics of geographical barriers.
Lab 12: DD-RADSeq (PCR Test of Successful Library Construction)

Allyson Luber

November 19th, 2019

This lab session was combined with lecture for time efficiency. Order of class:

  1. PCR 1 TEST
  2. LECTURE
  3. GEL
  4. PCR 2  (final)

I. Test PCR: We tested for successful library construction of our Mimulus guttatus samples (restriction digest + ligation of barcodes) using a test PCR. PCR I: TESTS THE SUCCESS OF LIBRARY CONSTRUCTION. This PCR was performed with inexpensive non-high-fidelity Taq.

  1. Create Master Mix 1
  2. Ran PCR using PCR1 on BIORAD #1/2: 94 degrees celsius for 2 min, then 20 cycles of (94, 60, 68 degrees celsius for 30 seconds for all). 4-10 degrees celsius infinite hold
  3. After taken out of the PCR machine we ran the products of PCR 1 for each sample on a 1.5% agarose gel (o.75 g agarose in 50 mL TX TAE) with a 100 bp ladder at 130V for 40 minutes

Test PCR tubes (Samples 25-32)

Master Mix 1: Recipe for one PCR reaction of 16.0 μL. 10 rxn’s

  • NEB One-Taq 2x Master Mix (8.0  μL/1 rxn): 80 μL
  • Forward Primer (Primer 026, 10mM) (0.40 μL/1 rxn): 4.0  μL
  • Reverse Primer (10mM) (0.40 μL/1 rxn): 4.0 μL
  • Pure H2O (6.2 μL/1 rxn): 62  μL
  • Master Mix total: (15.00 μL/1 rxn) 150  μL
  • Library DNA Template (1.00 μL) –> total reaction volume 16.0 μL

II. Final PCR (PCR 2): This PCR run added the special “second barcode” sequences and the Illumina primers to our libraries of Mimulus gutattus, allowing us to identify which specific individuals a given sequence came from (Ligation barcode + PCR2 barcode). Each table used a different PCR2 primer. Our table: PCR2_7. PCR2: to generate final Illumina sequencing library

To add Illumina flowcell annealing sequences, multiplexing indices, and sequencing primer annealing regions to all fragments and to increase concentrations of sequencing, we performed a PCR amplification with a Phusion Polymerase kit

  1. For each library, we set up 4-8 PCR reactions (to combine and mitigate PCR bias) in 50 μL total volume
  2. For each PCR reaction, combine:
    • ~20 ng (~3  μL depending on concentration) of size-selected sample
    • PCR primers 1 and 2 at concentration 10 uM each
    • The recommended amount of 5X-HF buffer, 10 mM dNTPs, water, and Phusion DNAP
  3. Vortex, then spin down in microcentrifuge
  4. Run PCR2 on BIORAD #2 (Usually 10-20 cycles is sufficient). Increasing cycle number beyond this can introduce substantial mis-incorporation and exacerbate size and composition bias in final libraries
  5. Ran 2 μL of the products of PCR2 on a 1% agarose gel with a 100 bp ladder

Final PCR on samples 25-32 using PCR2_7

Master Mix 2 Recipe: One PCR rxn = 25.0  μL. 10 rxn’s made = ~220  μL

  • Phusion DNA Polymerase (o.31 μL/ 1 rxn): 3.1  μL
  • 5X Phusion HF buffer (6.25 μL/1 rxn): 63  μL
  • Forward primer (1.56 μL/ 1 rxn): 15.6  μL
  • Reverse primer (1.56  μL/ 1 rxn): 15.6  μL
  • DNTPs (0.63 μL/ 1 rxn): 6.3
  • DMSO (0.94 μL/ 1rxn) : 9.4  μL
  • Pure H2O (10.75  μL/ 1 rxn): 108  μL
  • Master Mix Total (22.0  μL/1 rxn): ~220  μL
  • Library DNA Template: 3.00  μL/1 rxn + MM Total = 25.0 μL/1 rxn

Lab 11: DD-RADSeq (Double-digest restriction associated DNA Sequencing)

Allyson Luber

November 12, 2019

DD-RADSeq (Double-digest restriction associated DNA Sequencing) Lab

I. Double Digest : digesting our M. guttatus samples. The objective of this part of the lab was to double digest 100-1000 ng of high quality genomic DNA with selected restriction enzymes, using a digestion buffer appropriate for both enzymes.

  1. Placed 6 μL of each of our sample’s DNA in a PCR tube, then stored it on ice
  2. Prepared Master Mix 1: Recipe for one double-digest reaction = 3.0 μL
  3. Added 3  μL of Master Mix 1 to each M. guttatus DNA sample
  4. We observed that the total reaction volume is now 9  μL.
  5. Next, we sealed the samples, vortexed, centrifuged, and incubated at 37 degrees Celsius for 8 hours on a thermocycler with a heated lid set to 50 degrees Celsius (run DD on BIORAD #11-2 –> DDRAD –> DD)

Master Mix 1 Recipe:

Master Mix: 11 RXN’s (due to the small volumes used and the viscous nature of the glycerol the enzymes are stored in, we made at least a 130% excess of MM1 to accommodate multiple rounds of pipetting)

  • CutSmart Buffer 10X (0.90  μL/1 rxn) : 9.9  μL
  • EcoRI-HF enzyme (0.28  μL/1 rxn): 3.08  μL
  • MSPI enzyme (0.12  μL/ 1 rxn): 1.32  μL
  • Pure H2O (1.70  μL/ 1 rxn): 18.7  μL
  • Master Mix total (3.00  μL/ 1 rxn) : 51.7  μL

Double Digest tubes:

  1. SAMPLE 7: MONO-002 (RICKY)
  2. SAMPLE 15: DIRA-010
  3. SAMPLE 24: LOTR-002 (ELI)
  4. SAMPLE 8: MONO-003
  5. SAMPLE 4: CHIM-004 (ALLYSON)
  6. SAMPLE 16: PRBN-001

I. Adapter Ligation: Performed all steps with samples in ice

  1. I added 1  μL of the working stock EcoRI adapter directly to the digested DNA
  2. Due to the small volumes used and the viscous nature of the glycerol the enzymes were stored in, we made at least a 130% excess of master mix 2 to accommodate multiple rounds of pipetting
  3. Prepared MM2
  4. Added 3  μL of MM2 to the digested DNA
  5. The total reaction volume is now 13 μL. (Dr. Paul did this part: incubate at 16 degrees celsius for 6 hours on a thermocycler with a heated lid set to 50 degrees celsius). After ligation the samples can be stored frozen for a few weeks, if needed.

Ligation tubes

  1. SAMPLE 25: ECO-2
  2. SAMPLE 26: ECO-3
  3. SAMPLE 27: ECO-4
  4. SAMPLE 28: ECO-5
  5. SAMPLE 29: ECO-6
  6. SAMPLE 30: ECO-7
  7. SAMPLE 31: ECO-8
  8. SAMPLE 32: ECO-9

Adapter Ligation Master Mix recipe for RADseq (Master Mix 2): 11rxn’s. Before making this Master Mix, we added 1  μL of the EcoRI adapter assigned to us to each of our digested DNA products. Recipe for one adapter ligation reaction is 3.0  μL

  • CutSmart buffer 10X (0.40 μL/1 rxn): 4.4  μL
  • ATP (10mM) (1.30 μL/1 rxn): 14.3  μL
  • T4 Ligase (0.20  μL/1 rxn): 2.2  μL
  • Pure H2O (0.10  μL/ 1rxn): 1.1
  • Universal P2 MspI adapter (1.00 μL/1  μL): 11  μL
  • Master Mix total (3.00  μL/1 rxn): 33  μL

Lab 10: PCR Reaction with M. guttatus

Allyson Luber

November 5, 2019

  • In this lab session we spent the majority of our time preparing the master mix to put into our small PCR tubes
  • The master mix ratio had to be 19.00  μL for each reaction, but since we are a table of 3, we multiplied each ingredient to 11 to produce enough Master mix for each person

Tubes/Specimen ID

  1.  DIRA-012
  2. CHIM-007
  3. CATB-RG
  4. RWCKAJC
  5. MAPLAJC
  6. CATB-EVR
  7. AEL-CATB
  8. MAPL-001
  9. RDRK-003

(Tubes 1-3 is Ricky’s; 4-6 is Eli’s; 7-9 is mine)

Master Mix: PCR Reactions (20  μL)

Ingredients / per rxn ( μL) / rxn x 11 ( μL)

  • ddH2O / 13.36 / 146.9
  • 10x buffer / 2.00 / 22
  • MgCl2 / 2.00 / 22
  • BSA / 1.00 / 11
  • dNTPs / 0.20 / 2.2
  • F-Primer (Miri 70) / 0.20 / 2.2
  • R-Primer (Miri 70) / 0.20 / 2.2
  • Taq / 0.04 / 0.41
  • Template / 1.00 / n/a

Total: 19.00 per rxn / 11 rxn’s (our group’s total): 208.91  μL

  • With the master mix finished, we pipeted 19.00  μL to each of our individual rxn’s


Lab 07: Phylogenetic Inference

Allyson Luber

October 8, 2019

Lab 07: Phylogenetic Inference

In this lab we continued our work using Geneious program on the computer. Today we worked on our COI sequences a little more, including usage of another program which I’ll introduce later.

  1. Clean up alignment of COI sequences that includes fish DNA barcode and sequences that was downloaded from Geneious last week. Alignment should look neat and almost uniformal.
  2. Next, we used a different program called jModelTest2 to figure out the best model of molecular evolution for our sequences. JModelTest2 was downloaded from a website provided by our professor.
  3. Back to Geneious, we had to export our alignment in Phylip format, then back at jModel, export the file.
  4. In jModel, we worked with our alignment for awhile. First we computed likelihood scores. When they were done we chose the best model based on some optimality criterion. The two methods were Akaike Information Criterion (AIC) and Bayesian Information Criterion (BIC).
  5. For both methods, the analysis was done instantaneously where we were then guided to look at the results table where all the scores for the various models were shown.

Bayesian Inference

  1. Back in Geneious we selected a MrBayes analysis for a tree builder. Before we could do this we changed a couple things such as substitution model, rate variation, outgroup, and MCMC settings. Changing it will depend on what your professor prefers.
  2. Ran the analysis — it was quick!
  3. This time, we ran the analysis longer using 1,100,000 for the “chain length” and 100,000 for the burn-in. After the analysis was finished, the posterior output should be different from the first

Maximum Likelihood

  1. This last part of lab required using maximum likelihood to infer a phylogenetic tree of our aligned data set. In Geneious, download RAxML under tools –> plug-ins
  2. Next, under evolutionary model we chose “Rapid bootstrap with rapid hill climbing”
  3. Once RAxML was finished a new line was created and from here we had to build a consensus tree using that new line.
  4. The same procedure was repeated but instead of using RAxML we used PHYML (downloaded it first under plug-ins)
  5. Used HKY85 model of molecular evolution for this our the final Bayesian tree

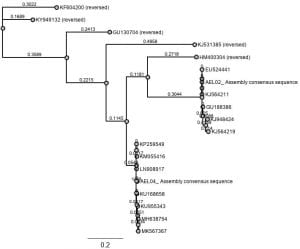
Final tree result

Lab 09: Gel Electrophoresis

Allyson Luber

10/29/2019

Lab 09:

We didn’t quite have a formal lab today, due to rescheduling purposes, but what we did instead was load our DNA samples from the previous weeks lab (Mimulus guttatus extractions) into the gel electrophoresis while we continued with lecture.

For each of our samples we loaded it with 2 μl of loading dye + 3 μl of our sample into each cell in the gel electrophoresis.

Order of lanes (L–>R)

  1. DIRA – 012
  2. CATD – RG
  3. CHIM – 007
  4. AEL – CATB
  5. MAPL – 001
  6. RDRK – 003
  7. EVR – CATB
  8. MAPL – AIC
  9. RWCK – AJC

#4-6 are mine.

Lab 08: DNA Extraction (M. Guttatus)

Allyson Luber

10/22/2019

Modified Alexander et. al tube protocol for DNA Extraction

  1. I started off with labeling 3 2.0 mL tubes with my sample code (001- MAPL, 003- RDRK, AEL-CATB)
  2. Added three sterile 3.2-mm stainless steel beads to each tube provided by Professor Paul
  3. Added a small amount of leaf tissue to each tube- we had to be careful to clean any tweezers or other tools used between tubes to avoid cross contamination
  4. Afterwards, we loaded the tubes within a tube rack into the modified reciprocating saw rack and mounted the rack to the saw. Ours was done by Professor Paul for 40 seconds
  5. Once done on the saw we briefly spun down the tubes in the centrifuge for 15-20 seconds to pull plant dust down from the lids
  6. Next thing, we added 434 μL preheated grind buffer to each of our sample tubes
  7. Incubated buffered grindate at 65 degrees celsius for 10 minutes in water bath, mixing the tubes by inversion every 3 minutes
  8. Added 130 μL 3M pH 4.7 potassium acetate, whilst inverting tubes several times then incubating on ice for 5 minutes
  9. Next, we spun the tubes in a centrifuge yet again at maximum force for 20 minutes, at 14,000 or 15,000 rpm for the tubes in a smaller microcentrifuge
  10. Bought coffee in this 20 minute break (you’ll need it).
  11. Labeled new 1.5 mL tubes with sample ID
  12. When finished centrifuging, transferred supernatant to these sterile 1.5mL microcentrifuge tubes– MAKE SURE TO ONLY GET SUPERNATANT AND NO PRECIPITATE
  13. Added 1.5 volumes binding buffer. It was around 600 μL of binding buffer, to be exact
  14. Applied 650 μL of mixture from step 11 to special little tubies, called Epoch spin column tubes and centrifuged for 10 minutes (until all liquid has passed through) at 15,000 rpm in a centrifuge and discarded flow-through in an erlenmeyer flask
  15. Repeat step 14 with the remaining volume from step 13
  16. Washed the DNA bound to the silica membrane by adding 500 μL of 70% EtOH to the column and centrifuge at 15,000 rpm until all liquid has passed to the collection tube (8 minutes). Discard the flow-through
  17. Repeat step 16
  18. After discarding the flow-through from step 17, we centrifuged the columns for an additional 5 min to remove any residual ethanol
  19. Discarded the collection tubes and placed the columns in sterile 1.5 mL microcentrifuge tubes– make sure these tubes are labeled with sample ID and date
  20. Finally, we added 100 μL preheated (65 degrees celsius) pure sterile water to each tube. Let it stand for 5 minutes and then centrifuged for 2 minutes at 15k rpm to elute the DNA

Lab 06: An Introduction to Geneious

Allyson Luber

October 1, 2019

Computer Lab: An Introduction to Geneioius

  • In this computer lab we were able to assemble, edit, and BLAST each of our sequence/reverse pairs
  • Allowed us to match the fish species we were supposed to be served at the restaurants
  • Attached below are snapshots of the nucleotide alignments for each species, aligned next to closely related (or the exact species) fish:

AEL02

AEL04

  • Specimen 02 (AEL02) was labeled as “Eel” on the menu and was found out to be matched with Japanese/European eel (Anguilla rostrata voucher; 99.1% grade)
  • Specimen 04 was labeled as “White tuna” and was found to be matched with multiple different tuna families (Thunnus alalunga, Thunnus orientalis)
  • In each alignment there were at least 10 polymorphic sites found (listed below)

02: 25, 76, 81, 105, 110, 123, 172, 196, 211, 241

04: 73, 124, 130, 133, 163, 250, 295, 340 (only 8)

  • Specimens 01 and 03 did not make it through the PCR process which is why we weren’t able to get and forward or reverse reads for it. Specimen 01 was supposed to be salmon and 03 was mackerel

Lab 05: Marin Fieldtrip!

Allyson Luber

September 30th, 2019

Marin, CA (Mt. Tamalpais State Park), September 24th, 2019

Goal/objective: Observe more populations of Mimulus guttatus in varied habitats around Mt. Tamalpais state park

First stop: Roadside along Highway 1! Beautiful Malibu/SoCal-like views overlooking blue waters and if you’re lucky you’ll catch Marin residents driving their super cars (and you might see some whales in the water)

On the roadside stop of Highway 1 there is natural (safe-to-drink) spring water sourced from Mt. Tam

Next to the spring water spouts is our friends– mimulus guttatus! These flowering mimuli love to get their feet wet and so they all stick around near the water spout. We discussed techniques of how bees pollinate these specific individuals since they’re planted right beside a mountain. Bees would probably fly upwards to find other flowers and plants. Along with mimuli, other water-loving plants surrounded the spring water spouts in a co-habitat, college roommates-living style. These other plants included watercress and horsetails, and we spotted fennel on the other side of the road where there’s dry soil (along the seacoast)

Fresh mint, another one of the plants living in the same habitat as mimulus guttatus in the creek area

Stop #2: Went to lower elevation where the creeks are to find mimuli in different habitats. This habitat was much more shady, cooler temperature, and much more plant/tree life surrounding us

This was one of the populations we spotted of mimuli that was in the creekside area. These mimuli are also dependent on rainfall in terms of flowering timing. For example, a sync population won’t flower because it would be too late in the year and rainfall will soon come. Rainfall is important in the sense that it determines the next generation, not just for mimuli but many of the other plants in this biome. Especially these days with higher variable climate, if there’s a drought year it will potentially take a longer time to flower.


Lab 04: Gel Electrophoresis/ ExoSap PCR Clean-up

Allyson Luber

September 17th, 2019

I. Electrophoresis of PCR products

  1. We took out our PCR tubes and let them thaw
  2. After thawing, one of our group members dotted out 13 loading dye dots (~1μl) on a sheet of parafilm (our group did 13 dots compared to the normal 16 dots because there’s only 3 of us)
  3. Next we pipettted 3 μl of each PCR product into its own dot, using a 10 μl pipette
  4. Loaded all dots into the gel (set pipette to 5 μl)
  5. Ran the gel at 130 volts for 30 minutes

Order of lanes on Gel Electrophoresis plate:

(Top)

  1. Negative control
  2. RG- 01
  3. RG-02
  4. RG- 04
  5. EVR-01
  6. EVR-02
  7. EVR-03
  8. EVR-04
  9. AEL-01
  10. AEL-02
  11. AEL-03
  12. AEL-04

15. Ladder

II. Clean-Up of PCR products for sequencing- ExoSAP

  1. Labeled new 0.2 μl PCR tubes with each of my sample codes (label twice on the side of tube)
  2. Make the ExoSAP Master mix – one per table
  • The volume of the Mater mix was calculated based off how many PCR clean-ups our table did
  • Put reagents on ice
  • Pipetted 7.5 μl of each PCR product into a clean, labeled 0.2 μl PCR tube
  • Made the the ExoSAP master mix, keeping the reagents on ice while it was made
  • Pipetted 12.5 μl of master mix into each PCR product tube
  • Placed the tubes in thermocycler and started the ExoSAP program
  • After program was complete, the PCR tubes were placed in a labeled tube rack and into the freezer

Master Mix volumes:

Master mix:                                         Rxn: 1                           Rxns: 13

  1. H2O                                           10.59 μl                            138 μl
  2. 10x buffer (SAP 10x)                 1.25 μl                              16.3 μl
  3. SAP                                            0.44 μl                              5.7 μl
  4. Exo                                             0.22 μl                              2.9 μl

Master mix total:                                 12.5 μl                            162.9 μl

PCR Product

PCR                                                    7.5 μl

Total Cleaned-up volume                    20.0 μl

End result of fish PCR 

(Last 4 lanes to the right, before the ladder, are mine)